By Luke Rocco & Justin Mifsud
September 2010
In this tutorial we walk you through how to create a Calendar Application for your DotNetNuke website using DotNetMushroom Rapid Application Developer.
The calendar application will have the ability to add events via a form and then display them in a calendar as shown below.
For this tutorial, you need the latest version of DotNetMushroom RAD (v.1.40), so please upgrade your copy for free if you have a purchased an earlier version and are still within the 1 year free upgrade period. Alternatively, you can
purchase DNM RAD v.1.40 on Snowcovered 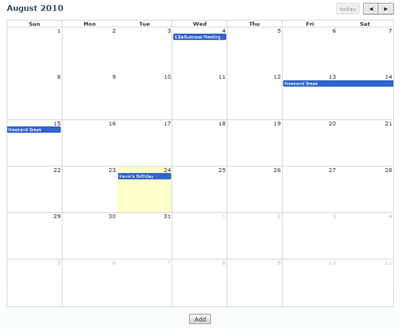
Step 1: Create an Events Table
The first step is to create an Events Table.
1.1) Go to the DotNetMushroom RAD Control Panel and create a New Application. For this demo, we have opted to call the application
DNM_Events 1.2) Go to Tables and press
New Table. Set the friendly name to
tb_Events as shown below and press the
Save button
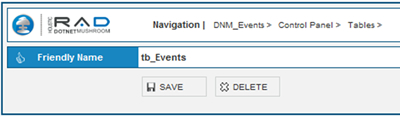
Screenshot of Setting the Friendly Name for Tables > New Table
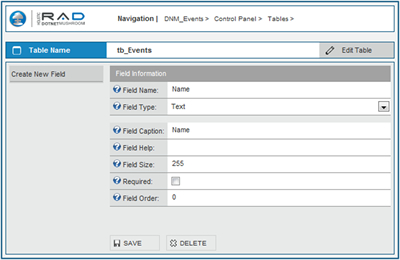
1.3) The field creation screen will appear automatically after pressing save. Create a
Name Field by typing the text
Name in the Field
Name and selecting
Text from the
Field Type dropdown. Type
Name in the
Field Caption textbox and press the
Save button. This step is shown in the screenshot below:
1.4) Upon Save, you will be automatically redirected to
create new fields. Repeat
Step 3 to create the following fields:
"Field Name - Field Type"
StartDate - Date/Time
EndDate - Date/Time
Summary - Text
FullDay - True/False
Step 2: Create an Edit Events Form
The Edit Events Form will allow the user to create and update events.
2.1) Press
Control Panel from the Navigation breadcrumb trail (next to RAD Logo). Alternatively, press the
RAD Logo. This will take you back to the Control Panel
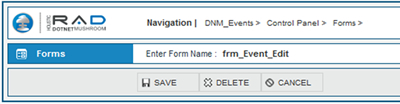
2.2) Press
Forms > New Form. For this demo, we have called our form
frm_Event_Edit. Press the
Save button to save the form. This step is shown in the screenshot below:
2.3) Upon save, you will be automatically redirected to the
form properties.
2.4) Set the
Data Source to Table:
tb_Events by using the drop down next to the Data Source label as shown below and press the
Save button

2.5) Click on the
Templates tab to switch to templates view and click on
Generate Edit Form Template link as shown below. This will automatically generate the HTML for the Edit form by making use of the fields and labels set in
tb_Events.

2.6) Add an Edit Button Control by selecting
DNMBUTTON from the
Control Type drop down and typing
btnEdit in the Add Control Text box next to it.
2.7) Add a Cancel Button by repeating step 6 and typing
btnCancel in the Control Name text box.
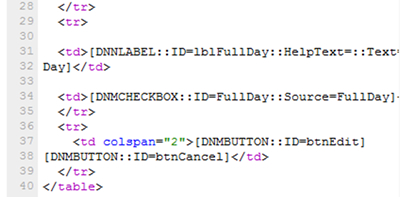
2.8) The end result should look like the following screenshot. We have placed the Save and Cancel button controls inside a table cell by typing in the HTML tags shown in lines 36 – 39 below:
2.9) Press the
Save Template button
2.10) Click on the
Properties Tab 2.11) Set the properties for the Date Controls (
StartDate and
EndDate) as follows:
- Check Hide Date Dropdowns
- Make sure that the Edit View checkbox is checked
2.12) Select the
btnEdit button properties by clicking on it in the left hand side grey menu
2.13) Type
Save in the
Button Text textbox and also assign it the button event
Save & Back to Caller (from the drop down menu). Press the
Save button to save the button properties.
2.14) Select the
btnCancel button properties, type
Cancel in the
Button Text textbox and assign it the
button event Back to Caller. Press the
Save button to save the button properties.
Step 3: Create an Event Calendar Form
This form will make use of the DNMEVENT Control to display the Events Calendar.
3.1) Click on the
RAD Logo to go back to the Control Panel
3.2) Press on
New Form 3.3) In the
friendly name textbox, type
frm_Event_Calendar and press the
Save button to save the form.
3.4) In the properties, do not set the Data Source but leave it as blank
3.5) Press the
Templates tab to switch to Templates View
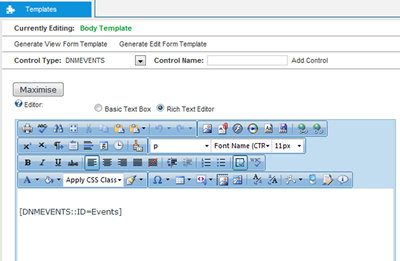
3.6) Add a DNMEVENTS control by selecting
DNMEVENTS from the dropdown menu, typing
Events in the Control Name texbox and then pressing the
Add Control Link. The end result can be seen in the screenshot below:
3.7) Add a DNMBUTTON Control by selecting
DNMBUTTON from the
Control Type dropdown and typing
btn_Add in the Control Name textbox. Press the
Add Control Link.
3.8) Press the
Save Template Button
3.9) Click on the
Properties Tab to switch back to Properties View
3.10) Click on the
btn_Add in the grey left menu to be able to set the properties of the Add Button
3.11) Set the properties for the Add Button as follows:
- Button Text: Type Add in the Button Text textbox
- Button Event: Select Navigate from the Button Event dropdown
- Press Click Here to Add Navigator
- In the Navigator, Select ”Change Form (Add New)” from the Key dropdown
- Also in the Navigator, select frm_Event_Edit from the dropdown in “forms”
- Press the Add button in the Navigator.
- Press the Done button in the Navigator.
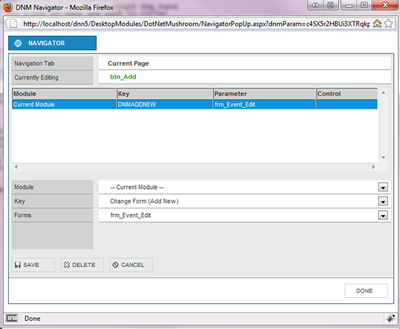
Screenshot showing the Navigator Properties for btn_Add
3.12) Press
Save in the form properties to save the properties for the Add button
3.13) Select
Events from the left grey menu to set the properties for the Events Control
3.14) Set the properties for the Events control as shown in the screenshot below:
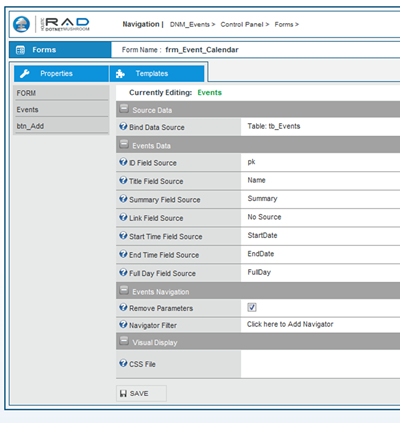
3.15) Press the
Save Button to save the properties for the Events Control
Step 4: Create a View Events Form
This form will enable the reviewing of the event details.
4.1) Go to the Control Panel and press
Forms > New Form 4.2) Call this new form
frm_Event_View and press the
Save button to save it
4.3) Set the Data Source to
Table:tb_Events through the “
Data Source” drop down
4.4) Press the
Save Button
4.5) Press the
Templates Tab 4.6) Press the
Generate View Form Template 4.7) Add 3
DNMBUTTON and call them
btn_Edit, btn_Delete and
btn_Cancel 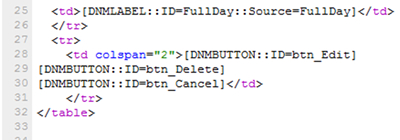
Screenshot showing the HTML for 3 buttons that were added in step 7.7
4.8) Press the
Save Template button
4.9) Click on the
Properties tab and assign the following properties to the 3 buttons just created
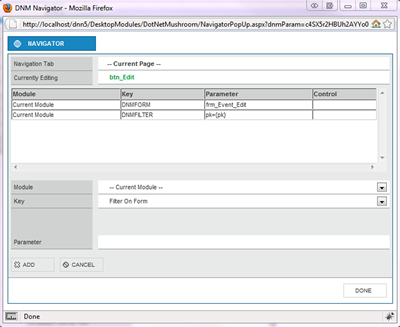
4.10) btn_Edit: Set the
Button Text to
Edit, set the
Button event to
Navigate and press the “
Click Here to Add Navigator”
4.11) Set the
Navigator properties as shown in the screenshot below:
4.12) Press
Done followed by the
Save button to save the properties for the btn_Edit
4.13) Select the
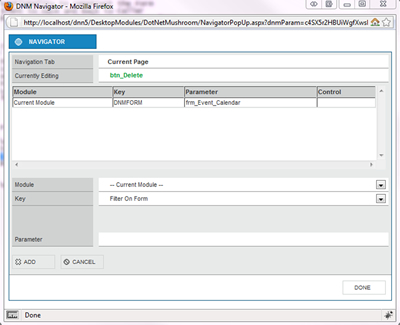
btn_Delete from the left grey menu and assign it the following properties
4.14) Set the
Button Text to
Delete, set the
Button event to “
Delete and Navigate” and press the “
Click Here to Add Navigator”
4.15) In the Navigator change the
Key to “
Change Form” and select
frm_Event_Calendar from the
Form dropdown and press
Add button. At the end of this step, the Navigator should look as follows:
4.16) Press the
Done button
4.17) Press the
Save button to save the properties for the btn_Delete button.
4.18) Select the
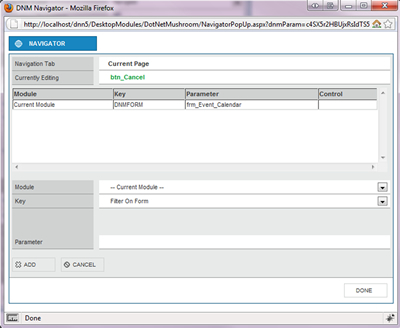
btn_Cancel button and assign it the following properties:
4.19) Set the
Button Text to
Cancel, set the
Button event to “
Navigate” and press the “
Click Here to Add Navigator”
4.20) In the Navigator, select “
Change Form” from the
Key dropdown and select
frm_Event_Calendar from the
Forms dropdown. The navigator should look like the screenshot below:
4.21) Press
Add and followed by the
Done button
4.22) Press
Save to save the properties of the btn_Cancel button
Step 5: Deploy the Calendar Application
5.1) Go to the page where you want to insert the Calendar Application and deploy the DotNetMushroom RAD module
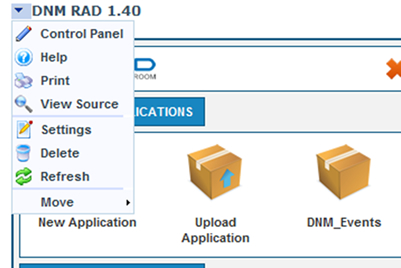
5.2) Click on
Settings as shown below
5.3) Go to the
DotNetMushroom settings and set it as follows:
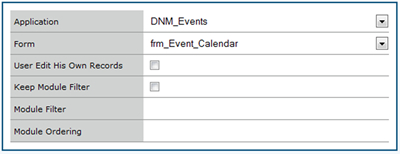
5.4) Press
Update and your Calendar Application is ready! The final result should look as follows:
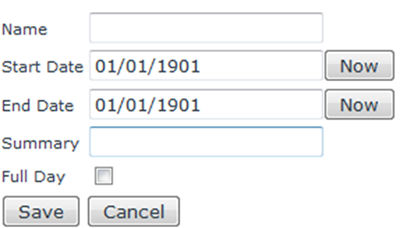
Screenshot of form to add a New Event
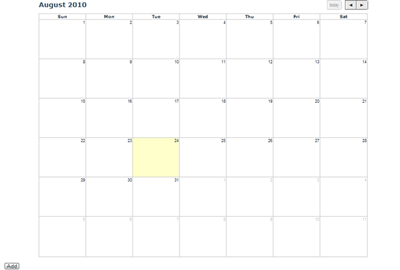
Screenshot of the Events Calendar
If you have any problems working with the DNM RAD module you can visit the
DotNetMushroom Forums.
Comments