By Ruben Gatt
April 2010
In this tutorial we demonstrate how to add paging functionality using the DotNetMushroom RAD Module.
This article is a continuation of the
How to Style the News Application Built with DotNetMushroom RAD article. We will be adding paging controls to the News Application using DotNetMushroom RAD Module.
Introduction
Before attempting this tutorial it is recommended to follow the preceding tutorials regarding the DotNetMushroom RAD module if you are not already familiar with the features and functionality of the module. This article continues from the previous articles so we recommend you install or create the application by following the previous tutorials.
Creating News Items
After creating or installing the Multi-Language News Application you should start by adding a minimum of 7 news items so that when the paging control is implemented the results will be visible.
Screenshot of the English Language news items
You will notice that while adding more than 3 news items, even though the news items are created, only 3 are visible to the user. This occurs because in the properties of the “NewsView” form there is a setting which tells the application how many items need to be rendered (shown in the screenshot below).
Screenshot showing the NewsView Form Properties
The value of the property “Items Per Page” is currently set to 3 which will therefore display only 3 news items at a time. Also notice that the “Enable Paging” property is ticked which means that, if available, the form will display the paging control.
Creating the Paging Control
Now that we have added some news items and that we have “Enable Paging” checked (if the property is not checked, please make sure you tick the checkbox before proceeding) the next step will be to add the paging control to the Template.

Screenshot of the Templates button
Click on the template button and navigate to the Footer Template. We need to create the paging control in either the Header and/or the Footer Templates only. This is because the Body and/or Alternate Body Templates are normally repeated to display the items.
Screenshot of the Footer Template button
In the footer template you should see a group of empty paragraph tags and another group that will contain the “Add New” button.
Add a new paging control by selecting a control of type DNMPAGING and enter the name of the control, in this case “frm_paging”.
Screenshot of the Paging Control dropdown item
Once the control is added to the template, drag it into the empty paragraph tags so that it is contained inside the paragraph tags and press the “Save Template” button.

Screenshot of the Paging Control code

Screenshot of the Save Template button
Setting the Paging Control Properties
Once the paging control is created in the Footer Template we need to modify the paging control properties.
Go back to the properties tab.

Screenshot of the Properties button
Click on the paging control name, in this case the control is named “frm_paging”.
Screenshot of the paging control button
On the right hand side of the DotNetMushroom RAD Module you should be able to see all the properties that can be set for this control.
Screenshot of the properties of the paging control
The paging control is made up of what are called tokens. Each token represents an element from the paging control e.g. the First Page token, the Next Page token, etc…
The tokens’ names are straight forward and are easy to understand. All the tokens accept HTML code as a property, therefore you are free to style the token’s text or even add an image instead, as shown below.
Screenshot of the paging control properties
Fill in the properties as shown above. Each Token property can be modified as desired, but in the “Current Page” and in the “Paging Control” Templates, only the tags shown can be used, but they can be ordered as desired.
In the Table CSS Class, Current Page CSS Class and Tokens CSS Class you can specify a CSS class. In this example, all of the CSS Classes were specified to demonstrate their use in this tutorial, but it is not required to specify all of the classes.
Once the paging control properties have been filled in press the “Save” button to save the properties of the paging control.

Screenshot of the Save button
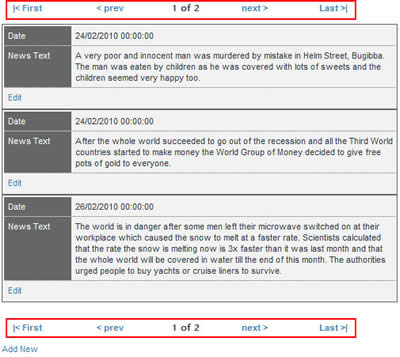
The paging control should now be visible above the Add New button and underneath the news items since the control was saved in the Footer Template.
Screenshot of the paging control
Notice that the paging control is displaying "page 1 of 2" which means that there are other items that can be made visible.
The paging control buttons function in the following way:
- First: navigates to the first most item in the list
- Prev: shows the previous items
- Next: shows the next items
- Last: shows the last most item in the list
Adding Two Paging Controls in the Same Form
Earlier in this tutorial we explained that the paging control can be placed in either the Header and/or the Footer Templates, so now we will copy the paging control created in the Footer Template in order to display the paging control at the top of the form too.
Go back to the “NewsView” form and navigate to the Footer Template of the form. Now copy the paging control code (do not delete just copy).
<p>[DNMPAGING::ID=frm_paging]</p>
Then click on the Header Template button.
Screenshot of the Header Template button
Next paste the paging control in the Header Template and press the “Save Template” button.
Screenshot of the Save Template button
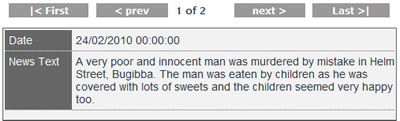
Now the paging control should also be visible at the top of the form before the news items. Since we copied the same control in the same form there is no need to reset the properties of the paging control as the same properties will be applied throughout.
Screenshot of the two paging controls
If you wish to create two paging controls with different styles, a new paging control should be created by assigning different CSS Classes in the Properties tab to the other paging control.
Styling the Paging Control
Now that the paging control is ready and set in the “NewsView” form, it is time to design the control and smoothly integrate it with the news application design.
Open the news.CSS file which is found in the DotNetMushroom folder within the portal’s root folder.
Add the code below at the end of the file and save news.CSS
/* Paging Control Properties */
/* ------------------------- */
.pagingTable { width:500px; margin:10px 0;}
.pagingCurrent{ font-weight:bold; font-family:"Lucida Sans"; text-align:center;}
.pagingToken, .pagingToken:link, .pagingToken:visited {display:block; padding:2px 5px; color:#fff!important; background-color:#999; font-weight:bold!important; text-decoration:none; text-transform:none!important; text-align:center;}
.pagingToken:active, .pagingToken:hover{ background-color:#FF6600; padding:2px 5px; color:#fff!important; font-weight:bold!important; text-decoration:none; text-transform:none!important;}
Now the paging control should look like the screenshot below.
Screenshot of the final styled paging control
Finally the paging control is completed.
If you have any problems working with the DNM RAD module you can visit the
DotNetMushroom Forums.
Comments