By Justin Mifsud
January 2010
This article is a continuation of the How to Build a News Application with DotNetMushroom RAD article . We will be styling the News Application via HTML and CSS. The objective of this article is not a tutorial on HTML and CSS styling but rather on how HTML and CSS can be applied through the DotNetMushroom RAD.
DotNetMushroom Rapid Application Developer (RAD) is a new application builder for DotNetNuke. It was launched at OpenForce Europe’09. The scope of RAD is to allow a user or developer to build an application which is made up of tables, queries, and forms.
You can install a trial version of DotNetMushroom RAD from the
DotNetMushroom website.
Programmer / Designer Approach
DotNetMushroom RAD helps developers and designers to interact better by giving them separation of development and designing model. Any development, such as creating tables, queries and forms, as well as javascript code is separated from the design aspect, for example designing the HTML template or CSS.
CSS in DotNetMushroom RAD
When creating a DotNetMushroom RAD Application, it is recommended that a CSS file is created that pertains only to that application. In this way, the CSS that solely belongs to that application will be loaded only when that application is loaded. Apart from loading time improvement, this approach makes it easier to modify the CSS that belongs to different DotNetMushroom RAD applications since these can be located in separate CSS files as well as making it easier for you to port a RAD application from one portal to another.
HTML in DotNetMushroom RAD
As shown in the
article in Issue 51, by pressing on the template auto generate buttons (Generate Edit Form Template and Generate View Form Template), DotNetMushroom RAD will automatically place all controls within a HTML table structure. So basically, the HTML for the News Application has already been created. In this tutorial, we will be modifying this HTML to change the structure of the View and Edit Forms and apply CSS to it.
Step 1: Create a CSS File and place it in the DotNetMushroom Application Folder
Whenever you create an application with DotNetMushroom RAD, a folder entitled DotNetMushroom is created in the portal where your application resides. Inside this folder, there will be other folders named by a number which represents the application number you have developed. Since we currently have just one application, there will just be 1 folder inside the DotNetMushroom folder. Click on it to view its contents and you will find another 2 folders: Templates and XML. Create a new folder at this level and call it CSS. Inside it place the CSS file that you will use to style the application. Let’s name it news.css.
Suppose that you are currently working on your local host installation of DotNetNuke, then the full path for news.css would look something as follows:
C:\Inetpub\wwwroot\DNN\Portals\0\DotNetMushroom\2\CSS\DNN\news.css
Step 2: Edit the HTML of the Edit Form
After completing the tutorial in Issue 51, the NewsEdit form looked like this:
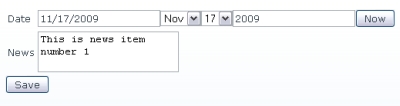
Screenshot showing the NewsEdit Form as it is now
The objective now is to optimize the way it looks via a combination of HTML and CSS.
2.1
The first step is to link the CSS file that we have just created to the NewsEdit form. To do this, go to Control Panel > Forms > NewsEdit. In the properties tab, scroll down to the form design section. Then, type news.css in the CSS FileName textbox as shown in the following screenshot:
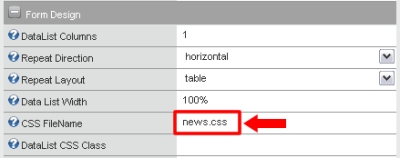
Screenshot showing how the CSS file is attached to the NewsEdit Form
This will attach the news.css file to the NewsEdit form.
2.2
Next, we will disable the textbox or the dropdown from the date control. In this way, we will just have one way through which the date is selected. For the scope of this tutorial, the preferred method of date entry will be the 3 dropdown system. Therefore, we will be disabling the text box. To do this, while in the NewsEdit form, click on the Date control and tick the Hide TextBox checkbox under Date Control Design.
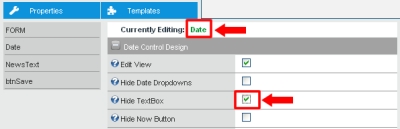
Screenshot showing how to disable the textbox of the Date Control
As can be seen from the above screenshot, if you would like to hide the dropdowns and display the date selection as a text box, then, the Hide Date Dropdowns textbox should be selected and the Hide Textbox enabled. Ticking the Hide Now Button would hide the now button that is appearing next to the date dropdowns. For the scope of this tutorial, we will be leaving the now button.
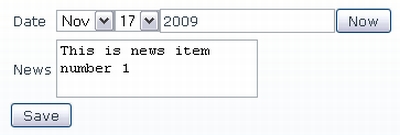
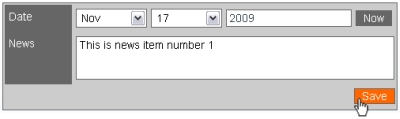
At the end of this step, your NewsEdit form should look like this:
Click on the Save button in the form properties to save this setting.
2.3
We will now be editing the NewsEdit form’s HTML. Clicking on the Templates tab, you load the form design editor. Whilst some may prefer to use the WYSIWYG editor, we prefer and recommend that you edit your form templates directly by modifying the HTML via the template’s source code.
To do this, click on the Source button at the top left hand of the editor. This will switch the view to HTML. The following screenshot shows some of the elements that one should notice, since they typically outline the key components of the structure for a DNM form:
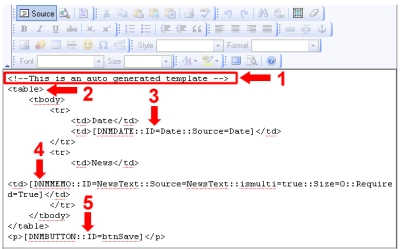
Screenshot showing the different components that typically make up a DNM RAD Form Structure
From the screenshot above:
- The commented out text “This is an auto generated template” is automatically created by DotNetMushroom RAD whenever one creates the template for a form via the Generate View Form Template or Generate Edit Form Template buttons as in this case. Since this is commented out text, you may leave it or remove it. Either way it does not affect how the form is displayed.
- By default, the Auto Generate buttons will create a table structure. We can play around with the structure how we want. Obviously, the most important thing is that all controls are left placed. Also, you may opt to change the structure from table based to div based for example. For the scope of this tutorial, we will keep the table structure and style everything via CSS.
- 4. and 5. are the DotNetMushroom RAD Controls that make up the NewsEdit Form. You will recognize the controls from other HTML elements because they typically have the following structure [DNM___ :: ID=___]. For example, 3 is the Date Control, 4 is a Memo Control and 5 is a Button.
Our recommendation is to keep separate the design for the layout and structure of the form from the design of the controls, such as the save button. For example, in this case, the styling that belongs to the table itself is passed here, in the HTML source editor. However, the styling that applies to the Save button, which is a control, is passed through the properties of the save button which can be accessed via the properties tab. This will be shown later on in this tutorial.
2.4
Now that the components of the form’s HTML have been identified, we will modify the HTML. As already stated, the scope of this tutorial is to show what can be done and from where to edit the form structure and pass the design and styling elements. The actual possibilities are then dependent on your imagination.
For the scope of this tutorial, I have added an id, newsEdit to the table (1), a class label to the left td (2, 4) and a class controlContainer (3,5) to the right td of the table. I have also added an additional row with a td whose class is buttonContainer (6). This will contain the Save Button and is thus a small demonstration that the HTML can be modified according to liking.
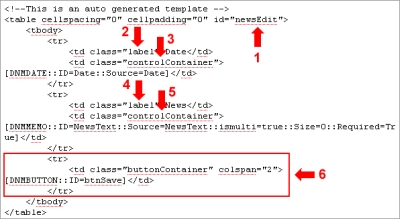
The modified HTML for the NewsEdit Form
Press the Save button to save the modified HTML.
2.5
Open the CSS File that you have attached to this form, in our case, the news.css and apply the CSS to the table ID and its td’s.
CSS of the Structure of the NewsEdit Form
As can be seen above, I have applied the CSS styling only to the structure (the table and it’s td’s) and NOT to the actual controls themselves. In fact, at the end of this stage, the NewsEdit form should look something like this:
Screenshot of the NewsEdit Form without Styling of the Controls
As you can see, the date control, the memo control and the button have not been styled yet.
2.6
To style the controls, we will place the CSS in the same file. As can be seen below, I have applied the same font type and size to all controls. Then I have created separate styles for the date control, memo control and button:
The way DotNetMushroom works is that for each control, it assigns an ID. Therefore, to apply specific CSS styles to specific controls, it is recommended to place the classes in the Properties of the respective controls.
For example, taking this scenario, suppose we had 2 text areas, then we can assign all common text area styling by something like this:
table#newsEdit textarea {font-family: Arial, Helvetica, sans-serif; font-size:14px;}
However, should we want to assign different styles to each text area, then the correct way is to state each class in the respective properties of each text area. In this tutorial, we will take this approach. Therefore, we can now add some CSS styling as follows:
The CSS segment for styling the Controls
Now all we need to do is go to the Properties Tab and link the specific control CSS classes to their controls. For example, in the date control we will apply the classes to the date drop down (2), the date text box (1) and the now button (3):
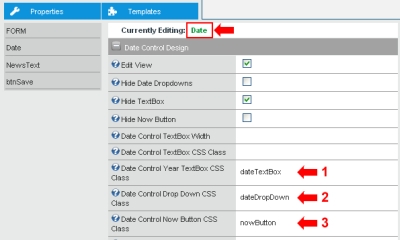
How to attach the CSS classes to the Controls
Interestingly, if the styling of a control consists of more than 1 class, say for example a class that is common to all buttons and a class that is specific to this button, then all you need to do is write both classes and separate them with a blank space. This is just like typing class=”classA classB”.
The same process will now have to be repeated for the NewsText and btnSave whereby the newsTextArea and saveButton classes will have to be attached as above.
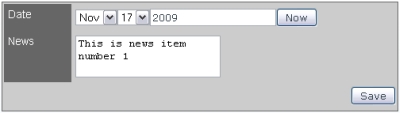
This process basically completes the styling for the NewsEdit form. At the end of this step, your form should now look something like this:
Screenshot of the completed NewsEdit Form
Step 3: Repeat Step 2 for the NewsView Form
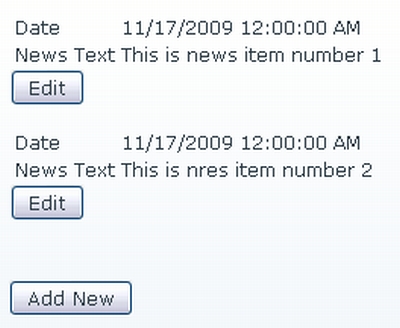
The NewsView Form as it is now
3.1
Attach the news.css CSS file to the NewsView Form.
3.2
Modify the HTML of NewsView form through its Template.
The NewsView Form has a Template for the Body and for the Footer. The body template can be modified in a very similar way to the body template of the NewsEdit Form. In fact, I have even opted to name the classes the same. I will then distinguish the CSS through the different ID’s that belong to the 2 tables.
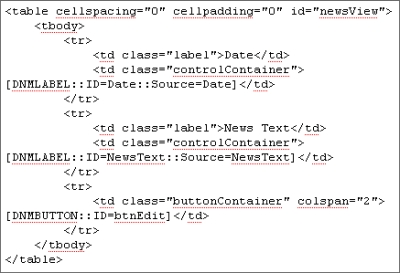
Screenshot of Modified NewsView Form Body Template – note the ID=”newsView”
The NewsView Footer Template can be modified as follows:
<p id="newsViewAddNewsContainer">[DNMBUTTON::ID=btnAddNew]</p>
3.3
Add the styling for the structure of the template into the news.css file (as explained in point 2.5). For this, I have added the following lines to my CSS file:
Additional lines in news.css to style the NewsView Form Structure
3.4
Add the styling for the controls in the NewsView Form. In this case we have 2 types of buttons – one for the Edit and one for the Add New. I have created the following CSS classes:
The additional CSS that is for the Controls in the NewsView Form
You can obviously use the same button classes as we have used in the NewsEdit Form and link those to the controls, say for example we create one generic button class and style all buttons with it. I have opted to create new classes just for the tuition purposes of this tutorial.
Then attach these classes to the btnEdit and btnAddNew controls in the NewsView Form (as shown in step 2.6)
At the end of this step, the NewsView Form should look as follows:
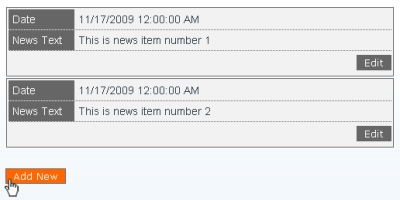
The styled NewsView Form
This completes the styling aspect of this two part tutorial. As you can see, DotNetMushroom RAD allows a lot of flexibility in structuring and styling forms in a way that we are pretty much accustomed to.
Please feel free to download the zip file containing the modified News Application and install it in DotNetMushroom RAD using the Unpackaging feature.
Comments