Upload the Snowcovered.com logo
Below you can see the various Snowcovered logos:


Right click these logos and select 'Save Picture As' to download them to your computer.
The logo we have used for this example is the medium sized logo:
SnowcoveredLogo-M.gif
Upload the medium sized logo to your DotNetNuke portal, make a note of the URL where you have uploaded the logo:
- Log in as Admin or Host
- Go to the Admin Menu / File Manager
- Create a new folder if required, and click on Upload
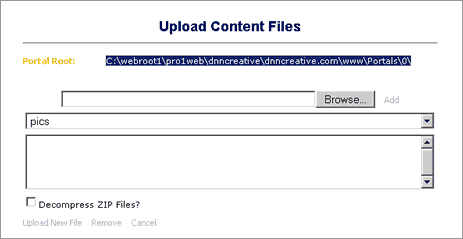
- On the Upload Content Files page, copy the portal URL link

File Manager, Uploading the Snowcovered Image
- Paste this URL link into your Notepad document
- Click Browse, select the SnowcoveredLogo-M.gif
- Click on Add
- Click on Upload New File
Create the URL for the Snowcovered.com logo
Take the Portal Root URL that you copied to Notepad and re-format it to the following:
(note: these links are example links and do not work)
Portal Link:
C:\webroot1\pro1web\dnncreative\dnncreative.com\www\Portals\0\
Becomes:
http://www.dnncreative.com/Portals/0/
- If you uploaded the image into a folder, add the folder names to the URL, eg.
http://www.dnncreative.com/Portals/0/affiliates/images/
- Finally add the name of the image
http://www.dnncreative.com/Portals/0/affiliates/images/SnowcoveredLogo-M.gif
- With this final URL, paste this into your Notepad document
Snowcovered logo URL:
http://www.dnncreative.com/Portals/0/affiliates/images/SnowcoveredLogo-M.gif
Test:
Paste this URL into your browser, a page should display which contains the Snowcovered.com logo.
If you do not see the logo, check the URL that you have created for any typing errors.
Create an XSL Transformation file
We now have all of the information we need to create an XSL transformation file.
Example 1
Displays the feed title, ie. Top Sellers: DotNetNuke 4 underneath the Snowcovered.com logo
Download example 1 –
Snowcovered_RSS_with_Title.XSL
(This is a zip file, you need to extract the XSL file)
From this file we need to make a few edits to add your own details.
13 <xsl:template match="rss/channel">
14 <div align="center">
15 <font style="font-family:Verdana" size="1">
16 <!-- **** Enter the URL for the snowcovered.com logo that you created in the src=" ... " **** -->
17 <img width="122" height="31" src="http://www.yourwebsite.com/Portals/SnowcoveredLogo-M.gif" alt="snowcovered.com"/>
18 <br></br>
19 <!-- Display main feed title -->
20 <xsl:value-of select="title"/>
21 </font>
22 </div>
23 <xsl:apply-templates select="item"/>
24 </xsl:template>
- Edit line 17 and edit the scr=”http:// …”
- Add the Snowcovered logo URL that we created earlier
34 <xsl:template match="item">
35 <br></br>
36 <!-- Limit the width of the text and format the font -->
37 <div style="width:132px;">
38 <font style="font-family:Verdana" size="1">
39 <!-- Display formatted description ie: '1. ' -->
40 <xsl:call-template name="getDescription">
41 <xsl:with-param name="getNumber" select="description" />
42 </xsl:call-template>
43 <xsl:text>. </xsl:text>
44 <strong>
45 <!-- make the title a link -->
46 <!-- to open links in a new window, change target="_main" to target="_new" -->
47 <!-- **** replace r=3b49c64e05 with your own affiliate ID **** -->
48 <a href="{link}&r=3b49c64e05" target="_new"><xsl:value-of select="title"/></a>
49 </strong>
50 <br></br>
51 </font>
52 </div>
53
54 </xsl:template>
- On line 48 edit the href=” … “
- Delete r=3b49c64e05 and enter your own affiliate ID in here eg.
<a href="{link}&myreferralid"
Further options
Formatting
On lines 37-38 we apply some formatting to the text, this limits the width of the text and applies a Verdana font.
Font
If your portal skin uses a default font that is suitable, then you can delete the font tags.
line 38
38 <font style="font-family:Verdana" size="1">
line 51
51 </font>
Width
The width value used here is set up for the DNN Creative skin, you may find that you can use a wider width for your skin.
Make sure you save the edited file.
Example 2
Allows you to enter your own text underneath the Snowcovered.com logo.
Download example 2 –
Snowcovered_RSS_with_own_Title.XSL
If you use this version, remember to change
- The Snowcovered logo URL – line 20
- Your referral ID – line 44
- To change the text, edit line 24
22 <font style="font-family:Verdana" size="1">
23 <!-- **** Edit your own title text here **** -->
24 <xsl:text>Top 10 Modules</xsl:text>
25 </font>
Make sure you save the edited file.
Add the RSS feed to your DotNetNuke portal
Within the News Feed (RSS) module:
- Click Edit NewsFeed
- Under News Feed Source, select External URL
- Location: Copy and paste the Top Sellers RSS feed
- News Feed Style Sheet, select File On Your Site
- Upload the XSL transformation file that you have just edited
- Click on Update
You should now see the Snowcovered.com RSS feed fully formatted with your referral ID imbedded in the links.
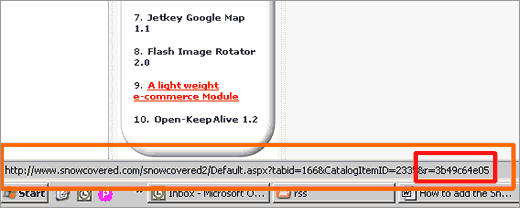
Check that your referral IDs are correctly working by hovering over the links and viewing the link here:

A correctly formatted link should display:
http://www.snowcovered.com/snowcovered2/Default.aspx?tabid=166&CatalogItemID=2335&r=3b49c64e05
Check that the end displays: &your_referral_id
Final Thoughts
You may now wish to adjust the container that the Snowcovered.com feed is displayed in. You may even wish to completely remove the container.
Other RSS Readers
Orizonti Nuke Feeds
Orizonti Nuke Feeds has an advantage over the core News Feeds (RSS) module because it can store the Snowcovered.com RSS feed in the DotNetNuke database, therefore speeding up page load times.
If you want to read further information we have created a
review of the Orizonti Nuke Feeds module.
You can add a Snowcovered.com RSS feed to Nuke Feeds using the following template:
First Steps:
Add the RSS feed link
- Select NukeFeeds Admin
- Click Edit Feeds
- Click New Feed
- Enter the Snowcovered.com Feed URL details
- In Frequency enter 60
(If you want to check for updates more often than every 60 minutes, then change this number)
Remove the sorting
- Click on Edit Options
- Click on Sort By: Published Date
Add the Template
- Click on Edit Template
- In Feed Header enter:
<div align="center"> <img width="122" height="31" src="http://www.mywebsite.com/Portals/0/SnowcoveredLogo-M.gif" alt="snowcovered.com"/></br> <font style="font-family:Verdana" size="1">Top 10 Modules</br></br></font> </div>
- Change the <img src=” … “ to the Snowcovered logo URL
- In Feed Item enter:
<font style="font-family:Verdana" size="1"><strong>[ItemCountStart1]. <a href='[Link]&r=3b49c64e05'>[Title]</a></strong></font>