|
|
|
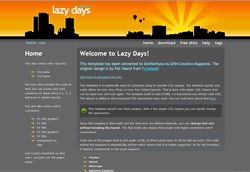
Lazy Days is a free, tableless, W3C-compliant website design.This skin comes in 3 variations:
- index – a 2 pane fluid skin
- index_sub_menu - a 2 pane fluid skin with a sub menu
- 1 pane – a 1 pane fluid skin, suitable for the administration area in DotNetNuke
It also comes with 6 containers:
- h1 title gradient
- h1 title
- h2 title gradient
- h2 title
- h3 title
- transparent no title
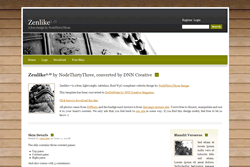
Zenlike 1.0 is a free, lightweight, tableless, fluid W3C-compliant website design. This skin comes in 2 different types:
- index_with_logo - uses the logo from the admin menu / site settings
- index - uses text for the site header which you can edit in the skin files
It also comes with 5 containers:
- h4 title box
- h4 title no bot line
- h4 title with bot line
- top pane h3 title
- transparent no title
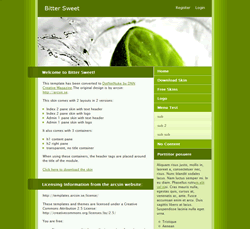
Bitter Sweet is a free, tableless, fixed width, XHTML compliant website design. This skin comes with 2 layouts in 2 versions:
- Index 2 pane skin with text header
- Index 2 pane skin with logo
- Admin 1 pane skin with text header
- Admin 1 pane skin with logo
It also comes with 3 containers:
- h1 content pane
- h2 right pane
- transparent, no title container
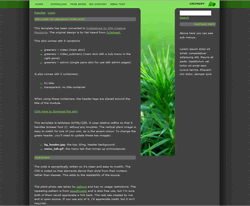
Greenery is a free, tableless, W3C-compliant website design. This skin comes with 3 variations
- greenery – index (main skin)
- greenery – index_submenu (main skin with a sub menu in the right pane)
- greenery – admin (single pane skin for use with admin pages)
It also comes with 2 containers:
- h1 title
- transparent, no title container
In this video tutorial we demonstrate how to style the search box in DotNetNuke skins. We walk you through how we applied the styling to the search box in the free ‘
internet sharing’ skin.
This covers how we expanded the width of the search box, how to use a graphic for the search box, how to style the text that the search box uses, how to style the search link as a button and how to replace the search link with an image.
This tutorial is part 2 of the How to create a DotNetNuke skin from an XHTML template tutorial.
In Part 2 of the tutorial we cover how to create the containers, semantically coding the content, styling and formatting the content, overriding the DotNetNuke default classes, how to easily add the additional skin layout variations, and how to setup and create a print.css file so that you can style your own print layout of the skin.
The videos cover:
- Video 1 - Creating the containers
- Video 2 - Text styling and overriding the default DotNetNuke styles
- Video 3 - Styling the header tags
- Video 4 - Styling content based on the content pane location
- Video 5 - Creating layout variations
- Video 6 - Creating an additional styled menu
- Video 7 - How to create a print layout (print.css)
Total Time Length: 60mins
In this tutorial we demonstrate how to convert a free open source XHTML pure CSS template into a DotNetNuke skin.
We demonstrate how to convert the andreas01 template created by Andreas Viklund.
This tutorial is in two parts, part 1 covers how to transfer the structure of an XHTML template into a DotNetNuke skin and how to adapt it to create the content panes, the menu and various DotNetNuke tokens.
The videos cover:
- Video 1 - Introduction and preparations
- Video 2 - Creation of content panes
- Video 3 - Login links and packaging skin
- Video 4 - How to fix layout display problems
- Video 5 - How to create the menu
- Video 6 - Adding the search box and validating the skin
Total Time Length: 52mins
This free XHTML / CSS website template is available to use without any limitations. It can be used on a non-commercial site as well as on a commercial one.
The skin contains six content panes:
- Top pane
- Content pane
- Content left pane
- Content mid pane
- Content right pane
- Right pane
And also comes with 6 containers:
- h1 container
- h2 container
- h3 container
- h3_lowercontent_panes
- h3_right_pane
- transparent, no title container
In this tutorial we demonstrate how to create pure CSS skin layouts that are Search Engine Optimized. We achieve this by taking advantage of using absolute positioning and floats.
This technique was developed for the new DNN Creative skin. Following the release of the DNN Creative skin we received several enquiries regarding how we placed the main text content at the top of the source code and the less important content towards the end.
Ordering the source code helps search engines to easily find and index the important content of your website and therefore will help to improve your search engine results.
In this tutorial we demonstrate the techniques using a stripped down version of the DNN Creative skin.
The videos cover:
- Video 1 - Introduction, file preparations and initial styling
- Video 2 - Creating the content panes
- Video 3 - Layout of the content panes
- Video 4 - Styling the content panes and footer
- Video 5 - Positioning the content panes and menu
- Video 6 - Positioning additional skin tokens
- Video 7 - Positioning horizontal banner pane and IE hacks
Total Time Length: 64mins
This tutorial is part 2 of the Pure CSS Search Engine Optimized Skin Layouts tutorial. We previously demonstrated how to create a 3 pane skin using floats and absolute positioning. We are now going to demonstrate how to create multiple skin layouts using a skinname.css file.
Using the skinname.css file technique allows you to easily create variations of skins while also reducing the amount of code placed in the skin.css file.
In this video tutorial we create a 2 pane version of the CSS skin using minimal code changes.
Time Length: 8mins
Read More..